3.0 - Updated on 06/11/25 by Kowal, Bryan
2.0 - Updated on 12/13/23 by Varadaraju, Sahana
1.0 - Authored on 06/14/18 by Roy Naha, Suchandra
The Rowan Identity Management System (RIMS) is a web-based application designed to collect hierarchical data from the top down and facilitates management by clarifying relationships, defining roles, levels of authority, and supervisory or reporting lines.
Supervisors (or their proxies) create an organization, job titles, positions and assign users to each position that they directly supervise. Before you begin, determine which employees report directly to you, and what their titles are. Note: You will need this information before you enter anything into RIMS.
Table of Contents
Access RIMS
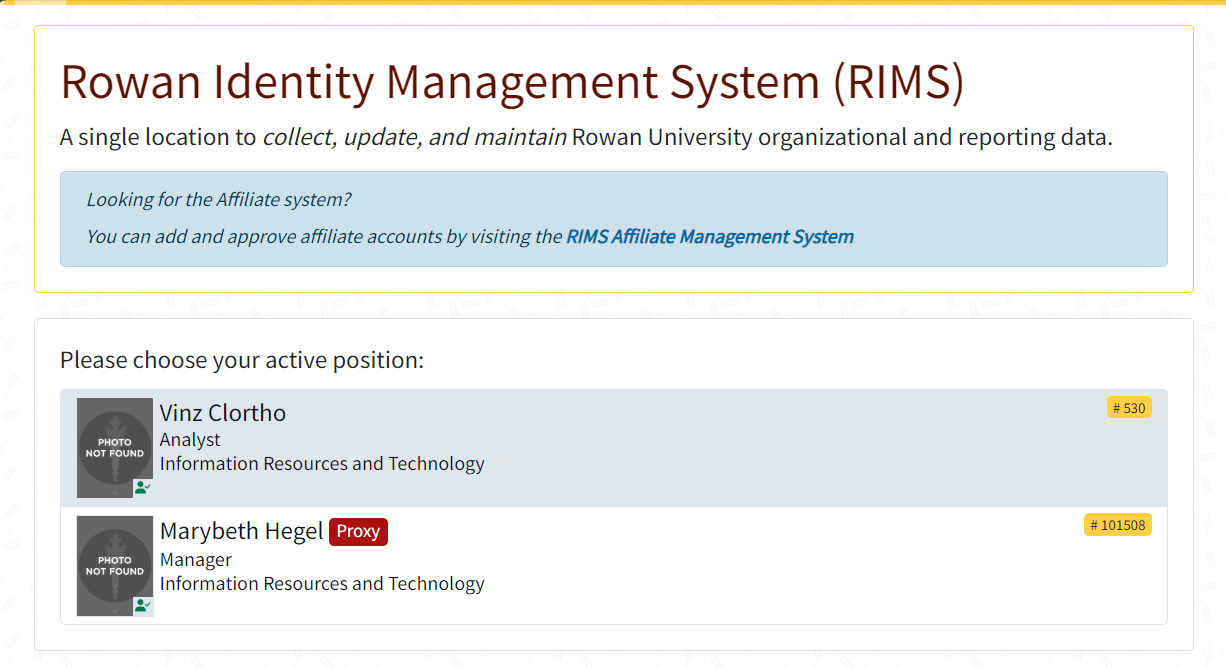
Go to rims.rowan.edu from your web browser. If you have more than 1 position, select your active position from the list. Note: Your active position is the position you are entering information for during the current session. If you are acting on behalf of someone else, you will set your active position as the person's proxy.
After clicking the desired position, click Continue.
Note: If you do not have an active position, your supervisor has not yet added you to RIMS. You must contact your supervisor to enter you into RIMS.

- Organization: This is the department or division name. Only create organizations for which you are directly responsible.
- Structural Organizations reflect the hierarchical structure of reporting divisions within Rowan. For example, the "Department of English" is a structural organization within the larger "College of Humanities" structural organization.
- Functional Organizations are loose affiliations of individuals that are intended to receive the same privileges. Functional organizations can be used to provide an email distribution list or grant electronic access to a diverse set of users that do not necessarily share a reporting structure. For example, a functional organization could be used to represent a University Senate committee, co-PIs on a grant, or an intramural softball team.
- Job Title: Use descriptive job titles like "Trainer" instead of "Professional Service Specialist." If you have three trainers you will only need to create this Job Title once. (Note: job titles are not used in Functional Organizations.)
- Proxy: Supervisors may assign a proxy to act on their behalf in RIMS.
- Role: Your primary function as determined by Human Resources.
- Position: A position must be created for each person that occupies a job title. For example, if you have three trainers, then three positions must be created, with the job title of "Trainer."
- Unoccupied Position: When you create a job title and select the number of openings for that position, they are considered unoccupied positions until you choose to assign a user to position to add an individual to that position.
- User/Person: The terms user and person are used interchangeably throughout RIMS. The user often refers to the individual currently logged into the application adding information, or the individual occupying a position.
Overview of Organizations, Job Titles, and Positions
If you select the Requests menu and click Submit Request. Under the section create your organizational chart you are able to create a new organization, a new job title, or a new position. All of these can be created during one session. It is not until you assign a user to a position under the add people to your organizational chart option that all changes you have made will be submitted to your supervisor for review and approval.
Your supervisor or their proxy will approve or deny the requests. If the supervisor denies a request, they should provide feedback about why it was denied. If a request is denied, the request will need to be resubmitted based on the feedback.
Tip: Many of the tasks you will need to perform in RIMS are available at the top of the Submit Request page. You can view the page by selecting Requests and then click on Submit Request.
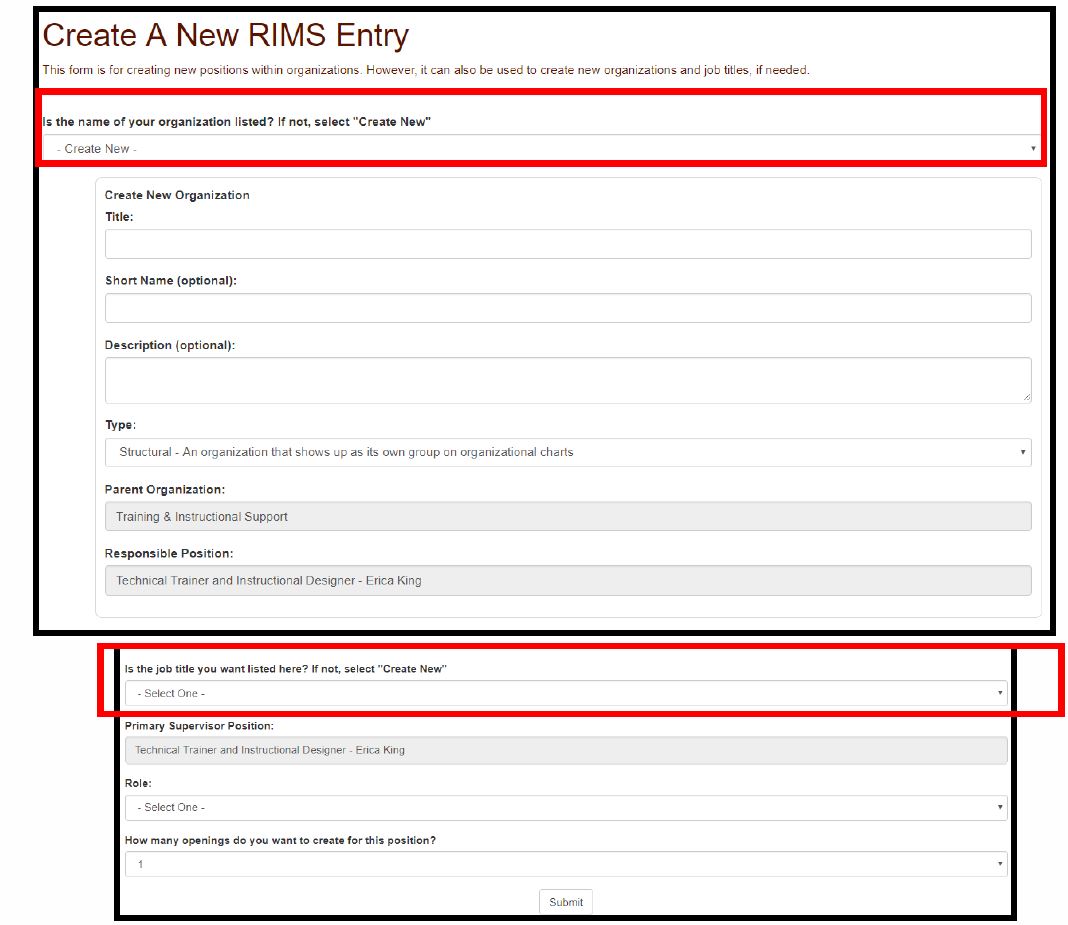
- To create a new RIMS Entry, click Requests on the menu bar at the top and then click Submit Request.
- Choose the first option to Create organizations, job titles, and positions.
- The form for Create a New RIMS Entry will open.
- If the organization is listed in the drop-down menu, then select it.
- If your Organization is not already listed, select Create New and fill out the information for a new organization.
- If the Job Title is listed in the drop-down menu, then select it.
- If the job title is not already listed select Create New and fill out the name of the new title.
- Then select the type of Role.
- Select the number of openings you need to create. For example, if you have three trainers, then you need to create three openings for the position of "trainer."
- When you are done, click Submit.
- Go to the next step of Assigning a User to Position.

- On the submit request screen choose the second option Add a person to your organization.
- Find the user by email, Banner ID or name. Select the correct person.
- Assign the user to an empty position from the menu and click Submit.
- When you assign the user to a position, this will trigger your supervisor to approve not only the user in the position, but also the new organization, job title, and the position.
- Wait for the approval from your supervisor. Your supervisor may deny the request and leave feedback. You must submit the information again with the changes suggested by your supervisor.
Assign a Proxy to Your Own Position
- Select Requests from the home page.
- Click on Submit Request.
- At the bottom of your screen choose Assign a proxy to your position.
- Find the user by email, Banner ID or name.
- Select and click Submit.
- Wait for approval from your supervisor.
Please note, more than one proxy can be assigned to a given position.
Maintain Your Organizational Chart
If you do not need to make multiple entries and want to perform one task, you can use the maintain your organizational chart menu. The menu includes options such as updating the name of your organization, removing a person from a position and removing an unused job title.
Options like update the name of your organization is useful if your organization has changed names. The update a job title option is used if your job title or a job title in your organization has changed. It is best practice to remove an unoccupied position if you have created a position that is now not needed. The same best practice applies to remove an unoccupied organization if one has been created and is no longer needed.
If a person in your structural organization takes a new position within the organization, first use the option, remove a person from a position. That removal will need to be approved by a supervisor. After the removal is approved, the person will be assigned to another unoccupied position, or if they are beginning a new position that did not exist prior, you must choose the option to Create New Position, followed by the option to Assign User to Position to add them to their new job. All removals require a supervisor's approval.
If you have more than one position in RIMS or you need to log in as a proxy for someone else, you will need to set the active position. Go to the user menu on the top right and choose Set Active Position. You can change your active position from here by clicking on a position in the list. After clicking the desired position, click Continue.
Approve or Deny a Request
A supervisor or proxy for a supervisor may need to approve or deny a request. If you log into RIMS and see a red box to the right of the requests menu with a number, it means there is a pending request that needs your attention. When you click on the requests menu you should see a red box next to the section requiring an action.
If there is a pending request that can be approved, click the Approve option and select Submit. If any changes need to be made, deny the request and leave a comment with the reason it is being denied. This will provide the requester with information to make the needed changes.
If you have more than one position in RIMS, you can change your preferred position and organization. In the user menu on the top right of the screen, select Set Preferred Position. Choose the new position - organization and click Submit. Please note that the job title is highlighted in color red and organization title in blue. An email would be sent to the user when the preferred position and organization is updated.
RIMS will allow you to create organizational charts. You are able to choose the number of levels to display. To view your organizational chart, select Identity Info and then select Org Chart.
The root position is your active position. To include your supervisor, select the check box next to include Root Position Supervisor, then select Reload Chart.
Tip: To view the organization of the level above you, select your supervisor's block and reload the chart again. Select Save Chart to download the organizational chart as a .png image file.
You can also search for a supervisor in the Root Position field by name or title and their organizational chart will reload on the page. You can download the organizational chart data to use in other applications by selecting the Export to CSV button.
For more information about the organizational charts and customizing them see KB0013065
The requests menu has options to view pending requests from you or your supervisor. For example, if you are acting as your supervisor's proxy, and have denied or approved in the past. You can also view pending requests that require attention or action. Items requiring action will have a red number beside them. If you have submitted a request that requires approval, there will be a pending with section to see who must approve the request.
Email notifications will be sent daily for all who have actionable RIMS item requests relevant to their positions. The information in the email only includes activities since the last email. Items include position assignments and assignments as a proxy. Occasionally an email will be sent if there has been no activity within your organization. This is a friendly reminder to periodically check your organization to ensure it is up to date and accurate.
Enabling Active Directory Groups from RIMS Organizations
RIMS data can be used to populate Active Directory objects. These objects can then be used for application security, door access, email lists, and a variety of other IT-related uses. For more information on enabling Active Directory groups for your RIMS organizations, please see our RIMS: Set Active Directory Group article.